
How to Replace The Rear Axle On A Mk2 Ford KA
Ford · Ka · Suspension
Ford Ka Axle MK2
First off, know this: your Ka's solid rear axle is a simple, robust piece of engineering. It's not independent like in some fancier cars, meaning it's a single unit. This keeps costs down and is generally very reliable... except for the "R" word.
The primary enemy is corrosion. The axle beam can trap moisture inside its box sections, leading to rust you can't even see until it's severe. It's the number one reason these axles fail the UK's strict MOT test. Catching it early is everything. A good clean inside and out, followed by a quality anti-corrosion treatment like Dinitrol cavity wax, is your best defence.
Sometimes, the issue isn't the beam itself but the parts attached to it. Worn-out axle bushes can cause clunking and vague handling, while failing wheel bearings create a grinding hum. The good news? These are often repairable without replacing the entire axle assembly.
Key Part Numbers for Your Ford Ka Mk2 Axle
If you need to replace components, here are some crucial OEM part numbers to guide you. Always double-check with your VIN at a Ford dealer or trusted parts supplier, as specifications can vary by model year.
-
Complete Rear Axle Assembly: 8S41-4005-AE (This is a common reference number; suffixes can change. A definitive source like Ford's Official Parts Catalogue is essential here).
-
Rear Axle Bushing Kit: Often sold as a kit for both sides. A common OEM reference is 8S41-5K600-AA.
-
Rear Wheel Bearing & Hub Kit: 8S41-1104-A (Typically includes the bearing, hub, and ABS ring).
-
Rear Shock Absorber (Damper): 8S41-18045-AE (Left) & 8S41-18046-AE (Right).
-
Rear Brake Backplate/Shield: 8S41-2K061-AA (Left) & 8S41-2K062-AA (Right) – often rust out.
When is a full axle replacement needed? If the beam itself is structurally compromised by rust, repair isn't safe. Sourcing a new or good-condition used beam is the only option. When looking, knowing your car's production date and engine size helps ensure a perfect match.
Keeping It Simple and Roadworthy
The dynamic here is straightforward: simplicity versus the elements. The axle's design is low-maintenance, but it demands proactive care to fight rust. It's less about high-performance upgrades and more about diligent preservation.
| The Situation | The Likely Cause | The Action |
|---|---|---|
| Rust on the axle beam | Moisture trapped inside | Clean, treat with cavity wax, monitor closely |
| Clunking over bumps | Worn axle bushes | Replace the bushings |
| Grumbling/humming noise | Failing wheel bearing | Replace bearing/hub assembly |
| MOT failure for corrosion | Severe structural rust | Source a replacement axle assembly |
Ultimately, your Ka's axle is a testament to simple mechanics. With regular checks—get under there with a torch and a screwdriver to poke (gently!) at the beam—and addressing small issues promptly, it will last for years. It’s not the most glamorous part of car ownership, but keeping it in shape guarantees more happy miles in your trusty little Ford. Now, maybe it's time for a quick visual inspection?
Lorem ipsum dolor sit amet, consectetur adipiscing elit. Ut elit tellus, luctus nec ullamcorper mattis, pulvinar dapibus leo.
How To Replace Your Mk2 Ford Ka Axle
While wear and tear are factors, corrosion is the true arch-nemesis of the Mk2 Ka's axle. Living up to its reputation, the Ford Ka's rear axle beam is its most famous victim. Exposure to road salt and moisture can cause the axle's surface to degrade rapidly, leading to serious structural weakness.
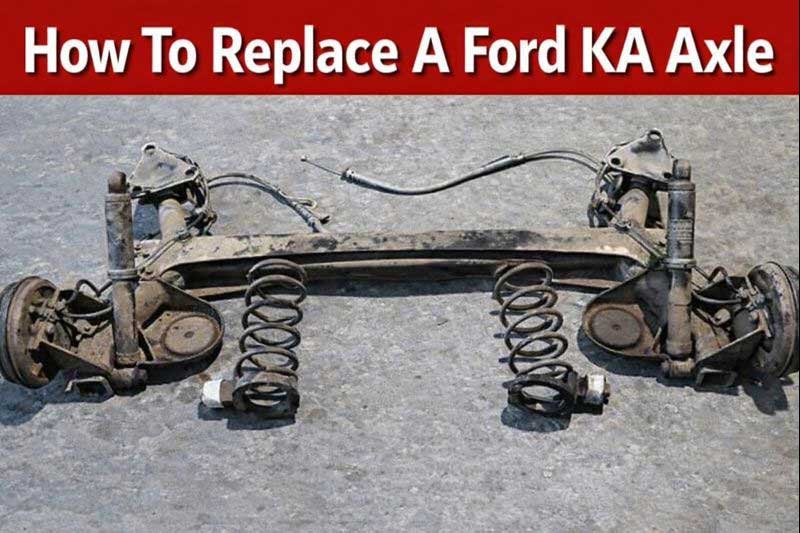
This isn't just about unsightly brown patches. Severe rust compromises the axle's integrity, risking dangerous failure. More commonly, it seizes the critical components mounted to it. The rear wheel bearings are pressed directly into the axle tubes, and when rust binds them in place, they cannot be removed separately. Attempting to do so often destroys the axle itself. Similarly, the four bolts securing the axle to the car's body frequently fuse solid, turning a simple bearing swap into a major battle.
Therefore, the most frequent repair path isn't just replacing a part on the axle, but replacing the entire axle assembly itself—beam, bearings, and sometimes brake backplates all as one unit. It's the most reliable and often the most time-efficient fix for a problem that, for many Ka owners, isn't a matter of if, but when.
Another Version below showing Part 1
Researched Version MK Axle Replace (This may not be 100% accurate)
Introduction & Safety Warning
This guide details the procedure for replacing the rear twist-beam axle assembly on the Ford Ka MK2 (2008-2016) and its platform sibling, the Fiat 500 (2007+). These vehicles share the same rear suspension design. The job is moderately complex, requiring intermediate mechanical skill, proper tools, and a safe working environment.
⚠️ CRITICAL SAFETY NOTES:
- Work on level, solid ground (preferably a concrete floor).
- Use rated vehicle jack stands—NEVER rely solely on a hydraulic jack.
- Wear safety glasses and gloves.
- Allow the exhaust system to cool completely if the vehicle has been recently driven.
- Disconnect the negative battery terminal before beginning.
- Have an assistant available for maneuvering the heavy axle assembly.
Part 1: Tools & Parts Required
Tools:
- Jack & Jack Stands: Minimum 2-ton capacity.
- Socket Set & Ratchets: Metric, ⅜” and ½” drive.
- Key Sockets/Spanners: 13mm, 15mm, 16mm, 17mm, 18mm, 19mm (some bolts may require spline/XZN bits—check before starting).
- Torque Wrench: Capable of 20-250 Nm (¼” and ½” drive recommended).
- Breaker Bar/Long Cheater Pipe: For high-torque/high-corrosion fasteners.
- Penetrating Fluid: (e.g., WD-40, Plus-Gas). Apply liberally to all fasteners days in advance if possible.
- Hub Nut Socket: 32mm (for front-wheel-drive hub nuts—required for driveshaft removal if lowering subframe).
- Ball Joint Separator/“Pickle Fork” or a dedicated track control arm ball joint removal tool.
- Wire Brush & Anti-Seize Compound: For cleaning threads.
- Drivetrain Support/Engine Crane or Jack: To lower and support the front subframe if necessary (alternative method).
- Exhaust Support Tool/Strong Wire: To support the rear exhaust section.
- Brake Line Clamp & Brake Bleeding Kit.
- Copper Slip/Grease: For reassembly.
Parts & Consumables:
- New/Rebuilt Axle Assembly: Includes twist beam, stub axles, and trailing arms. Ensure it matches your model (some have different spring platforms).
- New Hub Nuts: (If removing driveshafts) Always replace—they are single-use stretch bolts.
- New Bolt Kit (Highly Recommended): Includes:
- M12x1.75 x ~75mm (Axle-to-body pivot bolts) – Often requires replacement.
- M10 x ~35mm (Shock absorber lower bolts).
- M12 x ~70mm (Trailing arm pivot bolt at wheel bearing carrier).
- Brake Fluid: DOT 4.
- Threadlocker: Medium strength (e.g., Loctite 243).
Part 2: Pre-Operation Preparations
- Raise and Secure the Vehicle:
- Lift the rear of the vehicle using the designated central lifting point. Place jack stands under the reinforced sill points behind the rear wheels. Lower the vehicle onto the stands. The rear wheels should be clear of the ground.
- For additional safety, place the front wheels on wheel chocks and consider supporting the front subframe with a jack stand if you plan to lower it.
- Vehicle Preparation:
- Park on a level surface, apply the handbrake, and chock the front wheels.
- Open the bonnet and disconnect the negative battery terminal.
- Remove any rear interior trunk trim to access the top of the shock absorber mounts (in the rear wheel arches).
- Apply Penetrating Fluid:
- Soak the following fasteners: axle pivot bolts (located ahead of the rear wheels, under the car), shock absorber lower bolts, brake line bracket bolts, and trailing arm pivot bolts at the wheel bearing carrier.
Part 3: Removal Procedure
Step 1: Remove the Rear Wheels & Brake Drums/Calipers
- Remove the rear wheels.
- Drum Brake Models: Remove the brake drums. You may need to retract the shoes by levering the adjuster wheel through the access hole.
- Disc Brake Models: Unbolt the caliper carrier (usually two 17mm or 19mm bolts). Do not disconnect the brake hose. Hang the caliper from the chassis with wire—do not let it hang by the hose.
Step 2: Disconnect the Handbrake Cables & Brake Lines
- Handbrake: Under the vehicle, locate where the handbrake cable connects to the lever on the trailing arm. Depress the retaining tabs and detach the cable end. Free the cable from any guides on the axle.
- Brake Line: Place a brake line clamp on the flexible hose near its chassis connection. Using a 11mm and 13mm spanner (one to hold the solid line fitting), disconnect the metal brake pipe from the flexible hose at the union on the axle. Immediately plug the open lines to prevent fluid loss and contamination.
Step 3: Disconnect the Shock Absorbers
- From Below: Using a 15mm or 16mm socket and spanner, remove the lower shock bolt and nut. The shock may require persuasion to separate from its lower mounting bracket.
- From Above (Optional but Recommended): From inside the trunk, remove the plastic cover over the top of the shock. Using a deep socket (often 13mm or 15mm), hold the shock’s upper stem and remove the retaining nut. This allows full removal of the shock, making axle extraction easier.
Step 4: Disconnect the Trailing Arm from the Wheel Bearing Carrier
- This is the most challenging step due to corrosion. The trailing arm is connected to the carrier via a large horizontal bolt.
- Remove the nut (usually 18mm or 19mm). You may need to hold the bolt head (often a splined head requiring a special bit or a stubborn hex).
- DO NOT hammer the bolt out directly, as you risk damaging the threads and the carrier. Use a ball joint separator or a dedicated press tool to push the bolt out. Apply heat cautiously if necessary, avoiding the bearing seal.
Step 5: Support the Axle and Remove the Pivot Bolts
- Place a transmission jack or a sturdy floor jack under the center of the axle beam. Apply slight pressure to support its weight.
- Locate the two large pivot bolts that connect the axle to the body, just ahead of the spring pans. These are M12 bolts running fore-aft.
- Remove the nuts (usually 18mm). You will likely need a long breaker bar and possibly an impact wrench to break these free. The bolt may spin in its bushing sleeve—use a second wrench or a spline bit socket on the bolt head.
- Once both nuts are removed, drive the bolts out using a brass drift and hammer. The axle is now only held by the jack.
Step 6: Remove the Axle Assembly
- Slowly lower the jack supporting the axle. Ensure no components (brake hoses, cables) are still attached.
- Carefully maneuver the axle out from under the vehicle. It is bulky and heavy (approx. 20-25 kg). An assistant is invaluable here.
Part 4: Installation of New Axle
Step 1: Preparation
- Transfer all necessary components from the old axle to the new one: Brake backplates/disc shields, brake line brackets, handbrake cable guides, and springs.
- Spring Transfer Caution: Use proper spring compressors rated for automotive use. Compress the spring until it is loose on the old axle, then transfer it to the new axle in the same orientation before decompressing.
- Apply a thin coat of anti-seize compound to the pivot bolt sleeves and the trailing arm pivot bolt. Do not get anti-seize on friction surfaces (e.g., brake components) or inside bushings.
Step 2: Position the New Axle
- With the help of an assistant, lift the new axle into position on the supporting jack. Raise it carefully, aligning the pivot bushings with the mounting points on the vehicle body.
Step 3: Install Pivot Bolts & Torque
- Insert the new pivot bolts (M12x1.75, typically ~75mm long) from the front of the vehicle, pushing them through the body bracket and axle bushing.
- Hand-start the new nuts.
- Torque in two stages:
- Initial Torque: 50 Nm.
- Final Torque: 105 Nm (77 lbf·ft) + 90° additional turn. This is a torque-to-yield bolt—the 90° turn is critical for proper bushing preload. If using a non-OEM bolt, follow its specific specification, but OEM spec is highly recommended.
Step 4: Reconnect Trailing Arm to Wheel Bearing Carrier
- Align the trailing arm with the carrier. Insert the new pivot bolt (M12, ~70mm long).
- Hand-tighten the new nut.
- Torque: 95 Nm (70 lbf·ft) + 45° additional turn. Again, this is often a torque-to-yield fastener.
Step 5: Reattach Shock Absorbers
- If removed, reinstall the shock into its upper mount and tighten the top nut snugly from inside the trunk.
- Connect the shock lower eye to its bracket on the trailing arm. Insert the bolt and new nut.
- Torque (lower bolt): 75 Nm (55 lbf·ft).
Step 6: Reconnect Brake System & Handbrake
- Remove the plugs and reconnect the brake pipe to the flexible hose on the axle. Tighten the union firmly.
- Remove the brake line clamp.
- Reattach the handbrake cable ends to the levers and secure the cables in their guides.
- Reinstall the brake drums or caliper carriers.
- Caliper Carrier Bolt Torque: 95 Nm (70 lbf·ft).
Step 7: Bleed the Brake System
- This is mandatory. Refill the master cylinder with fresh DOT 4 fluid.
- Using a two-person method or a pressure bleeder, bleed the rear brakes starting with the wheel furthest from the master cylinder (typically passenger side). Continue until no air bubbles are present and the pedal is firm.
Step 8: Final Reassembly
- Reinstall the rear wheels (hand-tighten lug nuts only).
- Carefully raise the axle jack to take the weight off the stands, then remove the jack stands.
- Lower the vehicle to the ground fully.
Part 5: Final Torque & Check
- Final Wheel Torque: With the vehicle on the ground, tighten the wheel lug nuts in a star pattern to the specified torque: 110 Nm (81 lbf·ft).
- Top Shock Nut Torque (if accessible): Tighten to 25 Nm (18 lbf·ft).
- Handbrake Adjustment: Inside the vehicle, pull the handbrake lever up 3-4 clicks. There should be firm resistance. If adjustment is needed, it is typically done via an adjuster under the rear lever boot or at the equalizer under the car. Consult a model-specific guide.
- Road Test: Perform a low-speed test in a safe area. Listen for clunks or rubbing. Test brakes gently at first, then at normal operating speeds. The handbrake should hold the vehicle on a moderate incline.
Part 6: Troubleshooting & Tips
- Seized Bolts: If a pivot bolt snaps, you will need to drill it out—a time-consuming process. This is why penetrating fluid and patience are crucial.
- Alignment: The rear axle is a fixed twist-beam; replacing it does not require a full four-wheel alignment. However, a rear wheel toe check is advised to ensure the new axle is within specification. Significant deviation indicates a faulty replacement part.
- Noise After Installation: A slight creak from new bushings is normal for the first 100 miles as they settle. Persistent clunking indicates a loose fastener—re-check all torques.
- Parts Interchangeability: While the Ford Ka MK2 and Fiat 500 axles are functionally identical, always compare part numbers. Subtle differences (e.g., ABS sensor rings, spring perch design) may exist between model years and trim levels.
Conclusion
Replacing the rear axle on these vehicles is a substantial but manageable task for a competent DIY mechanic with the right tools. The key challenges are combating corrosion and handling the weight of the assembly. Using new bolts and following the precise torque-and-angle procedure is non-negotiable for safety and longevity. Taking your time during disassembly will save hours of frustration. Once completed, this repair restores the vehicle’s rear geometry and handling, addressing issues like chronic rear tire wear, knocking, and instability.